Windows Cannot Be Installed on the Current Disk Computer Hardware
Summary :
Windows cannot be installed to MBR/GPT deejay? Windows cannot be installed to dynamic disk? These are the most mutual issues that tin occur during the process of Windows x/8/7 installation. This postal service shows how to address such problems with detailed steps given.
Quick Navigation :
- Fault i: Windows Cannot Be Installed to This Disk. The Selected Disk Is of the GPT Partition Style.
- Fault 2: Windows Cannot Be Installed to This deejay. The Selected Deejay Has an MBR Partition Table.
- Error 3: Windows Cannot Be Installed on Dynamic Disk.
- Error 4: Windows Cannot Be Installed to This Disk. This Estimator'due south Hardware May non Support Booting to This Disk.
- Mistake 5: Windows Cannot Exist Installed to This Disk. The Disk May Neglect Soon.
- Mistake six: Windows Cannot Be Installed to This Hard Deejay Space, Windows Must Be Installed to a Partition Formatted in NTFS.
- Summary
- User Comments
When installing Windows Os (whether it is a clean install, reinstall or dual kicking), y'all may receive various kinds of errors saying Windows cannot exist installed to this disk. In this post, we will innovate 6 types of Windows installation errors also as meridian corresponding solutions.
Error 1: Windows Cannot Exist Installed to This Disk. The Selected Deejay Is of the GPT Partition Manner.
When installing Windows on a GPT disk, you may receive Windows cannot be installed on GPT disk error:
"Windows cannot be installed to this disk. The selected disk is of the GPT division style."
What causes this error?
Reasons
This is mainly because the motherboard supports Legacy BIOS just rather than both Legacy and UEFI or CSM boot. Under legacy BIOS mode, y'all can just install Windows to an MBR deejay since traditional BIOS cannot recognize GPT partition, simply information read/write on GPT disk is available as long as Windows supports information technology.
Solutions
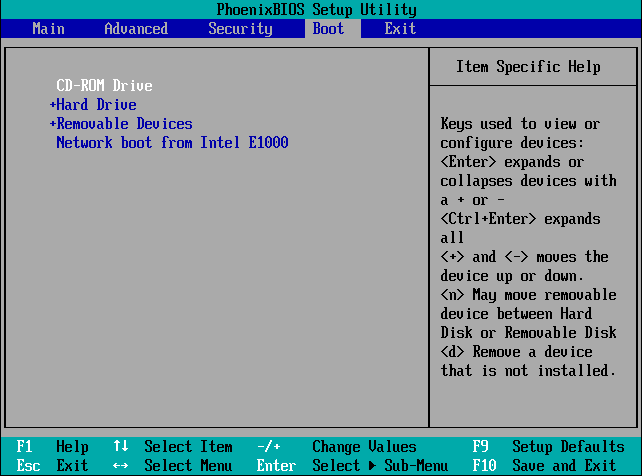
To set up this fault, firstly you need to enter BIOS Setup to see what the boot mode it is set to. Showtime/restart computer and continuously press a key to enter BIOS before the Windows logo appears. Different computers may require different keys, so you had ameliorate search "how to enter BIOS plus reckoner trademark or motherboard proper name" on the internet to find the verbal key.
In BIOS, if you find no signal showing yous are using a UEFI motherboard like the following picture shows, peradventure yous are using a traditional motherboard which supports legacy BIOS boot only. Nether this situation, the just solution is to catechumen the GPT disk to an MBR disk.
Here are the deals:
Solution 1. Convert GPT Deejay to MBR if the Motherboard Supports Legacy BIOS Only
Note: Nosotros volition explain 3 means to convert GPT deejay to MBR deejay. The 2nd & 3rd ways will crusade data loss since Windows requires you to delete all partitions.
ane) Use Partition Magician
MiniTool Partition Sorcerer Free Edition is a free yet outstanding partitioning tool for Windows Not-SERVER users, which helps to convert GPT disk to MBR disk without losing data when an existing Windows is available. Yet, you should know that Partitioning Sorcerer tin just change non-system GPT disk to MBR disk without bringing whatever data loss. This works for all Windows XP/Vista/vii/8/10 users.
Free Download
Tip: If no Windows can be used, you may need the assist of MiniTool Partition Wizard Bootable CD, a born tool that comes with all MiniTool Partition Wizard Paid Editions.
Step one: run MiniTool Partition Wizard.
Launch MiniTool Segmentation Wizard. Then right-click on the target disk to exist converted and choose "Convert GPT Disk to MBR Disk".
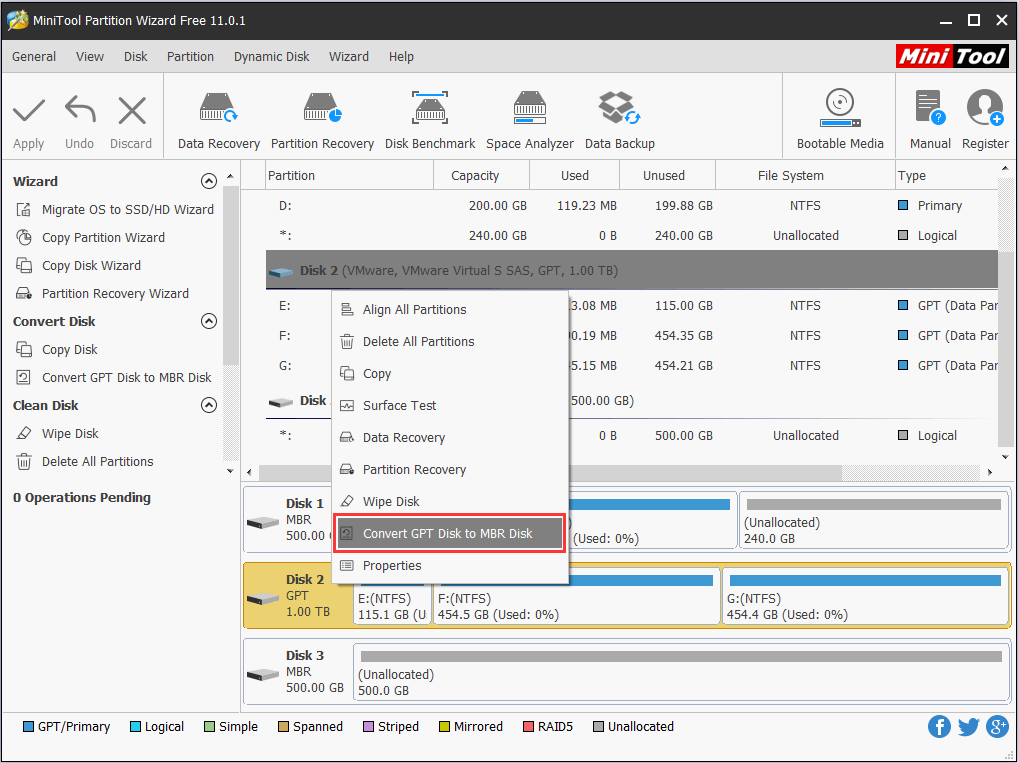
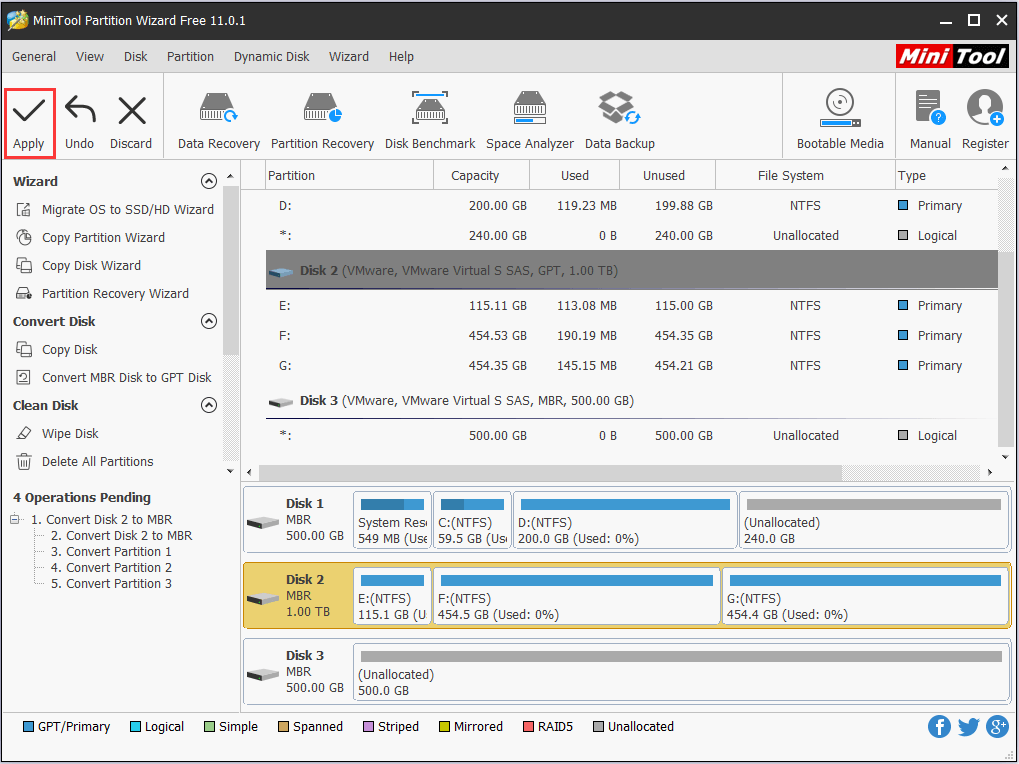
Step 2: confirm the conversion.
You will run into the GPT attribute has turned to MBR. However, this is only pending operations for us to preview. Please press "Apply" to confirm the modify. Later on the conversion, you will notice that all data is all the same there.
2) Utilise Diskpart
Information technology is possible to make the conversion during the installation process. Please do the post-obit:
Step ane: call out CMD.
Once the fault pops upwardly, click "OK" to close the mistake and try pressing on "Shift + F10" to call out CMD. If the utility does non sally, please go back to the install Windows interface, then press "Shift + F10" again to launch CMD.
Step two: clean the disk and catechumen it to MBR.
Now yous demand to practise a clean on the disk past typing the following commands:
"diskpart -> list disk -> select disk 1 (one signifies the number of GPT disk) -> make clean -> catechumen MBR."
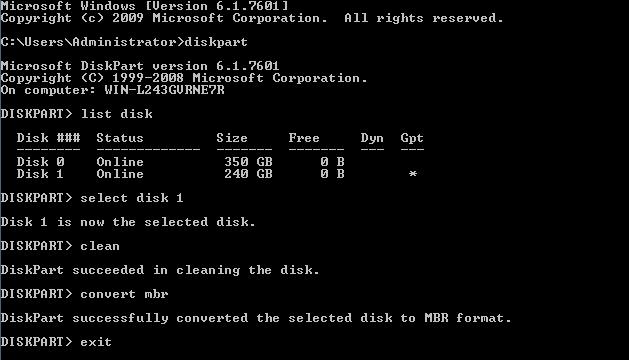
When diskpart shows information technology has successfully converted the selected disk to MBR format, you can exit from this program and continue to install Windows.
3) Use Deejay Management Utility
If another Windows OS is available on the same figurer, and so Disk Management utility is helpful. Endeavour these operations:
Step 1: become to Deejay Direction.
Showtime the working Windows and enter the born Disk Management tool past right clicking the "Reckoner" icon on the desktop, choosing "Manage", and selecting "Disk Management".
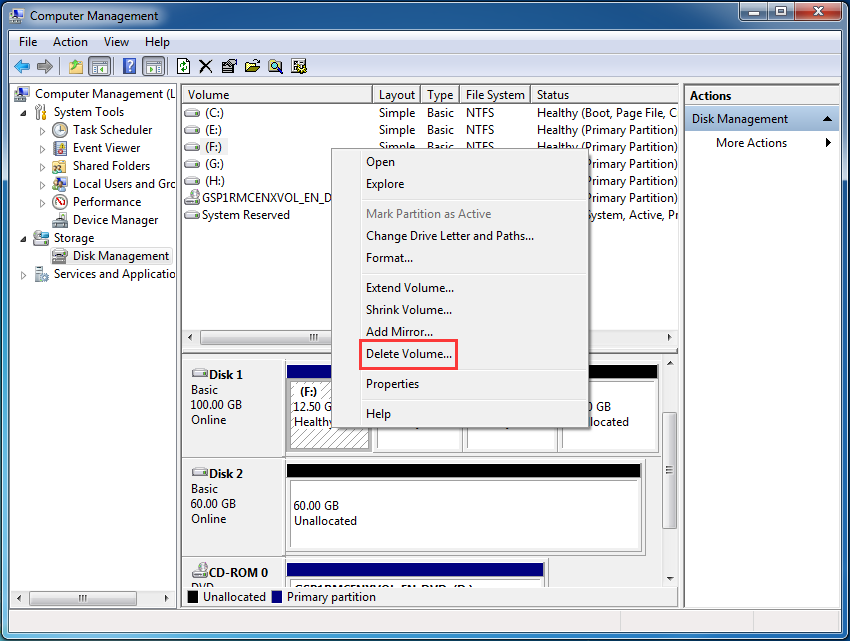
Stride 2: delete volume.
Delete all partitions or volumes on the GPT disk i past one via the right-click function "Delete Volume".
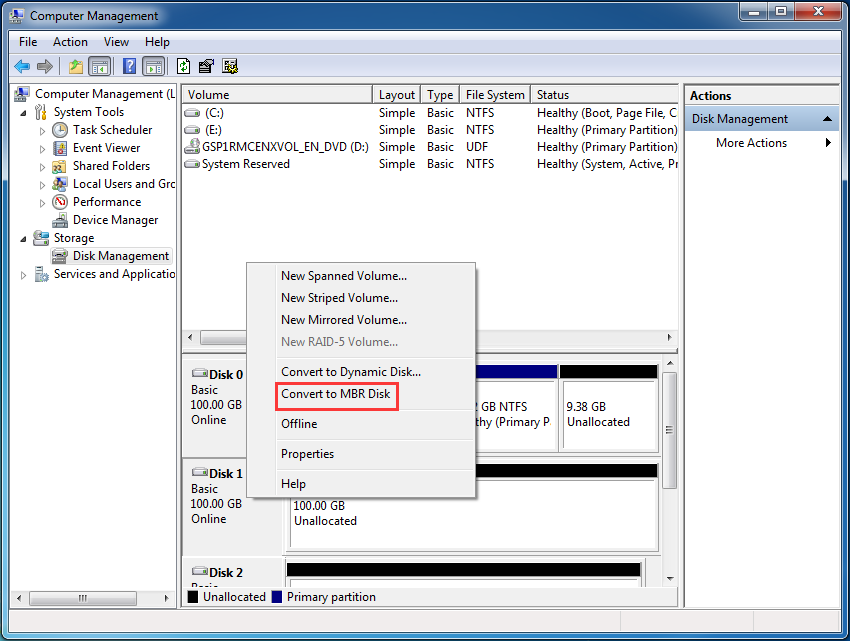
Step 3: convert to MBR disk.
When the entire disk becomes an unallocated space, right click the GPT disk and choose "Catechumen to MBR Disk". Afterwards these steps, the original GPT deejay volition be converted to an MBR deejay, so you can go on installing Windows on this deejay.
Tip: When deleting volumes yous may run across the state of affairs where some special volumes like system volume, recovery volume, and OEM book cannot exist deleted. For reasons and corresponding solutions, please see Cannot Delete Volumes in Windows.
Solution 2. Change Boot Way If the Motherboard Supports Both Legacy and UEFI Boot
Currently, most motherboards support both the Legacy boot and UEFI boot, and users can cull the most appropriate one manually. If y'all select Legacy only, information technology will exist impossible to install Windows on GPT disk. At this fourth dimension, y'all can enter BIOS and set the boot mode to CSM kick or choose Both.
One time the change has been made, please press on F10 to salve changes, and and then you can install Windows on a GPT disk.
Fault 2: Windows Cannot Be Installed to This disk. The Selected Disk Has an MBR Segmentation Table.
When installing Windows 7, Windows viii or other newly released Windows OS, you may receive some other error saying Windows cannot be installed on MBR disk:
"Windows cannot exist installed on this deejay. The selected disk has an MBR partitioning table. On EFI systems, Windows can only installed on GPT disks".
Why can't Windows be installed on an MBR disk under EFI systems?
Reasons
To answer this question, you demand to know something about UEFI + GPT boot. Nether EFI systems, theoretically both an MBR disk and GPT deejay can exist used to boot operating systems, merely Microsoft rules Windows can but be installed on a GPT disk. To gear up this error, the best way is to convert the MBR deejay to a GPT deejay.
Solutions
Catechumen MBR Disk to GPT Disk to Fix the Error
Steps are well-nigh the same as those to convert GPT disk to MBR disk, and the merely difference is that you need to convert deejay to GPT rather than MBR. For converting without information loss, delight see Convert MBR Deejay to GPT Deejay for more details.
That's not all…In the one-time role, we take said most UEFI motherboards back up both Legacy boot and UEFI boot but we tin can alter it manually. If the error is caused by setting boot mode to be UEFI but, irresolute the mode to Both or CSM boot may fix the mistake, which has been introduced in Mistake one.
Click to tweet
Error 3: Windows Cannot Be Installed on Dynamic Disk.
When installing Windows on a dynamic deejay, you may receive this message:
"Windows cannot be installed to this hard deejay space. The division contains one or more dynamic volumes that are non supported for installation".
Reasons
Why tin can't Windows exist installed on a dynamic deejay? Let's see what Microsoft Resource says.
"Yous tin can perform a fresh Windows installation on a dynamic book only if that book was converted from a basic volume and retained an entry in the partition table. Elementary volumes converted from bones disks do not take an entry in the partition table unless they were system or boot volumes prior to conversion."
That is to say users can only install Windows to a dynamic volume which was a boot partition or system partition before converting to a dynamic disk. Under this state of affairs, if you want to proceed installing Windows, a expert solution is to convert a dynamic disk to a basic disk.
Solutions
Convert Dynamic Deejay to Basic Disk to Solve the Trouble
Note: There are 3 ways to convert a dynamic deejay to bones: by using MiniTool Partitioning Wizard, Disk Management utility, and diskpart. Note that the latter two crave deleting all existing dynamic volumes, which means information loss.
1) Use MiniTool Partitioning Wizard
MiniTool Partition Sorcerer is a Windows based partitioning tool that tin aid revert a dynamic disk to basic without any data loss. Hither are detailed steps:
Pace i: run Partition Wizard and choose the function for dynamic deejay conversion.
Launch MiniTool Partition Magician. Right click on the dynamic deejay yous want to catechumen and choose "Catechumen Dynamic Disk to Basic Disk".
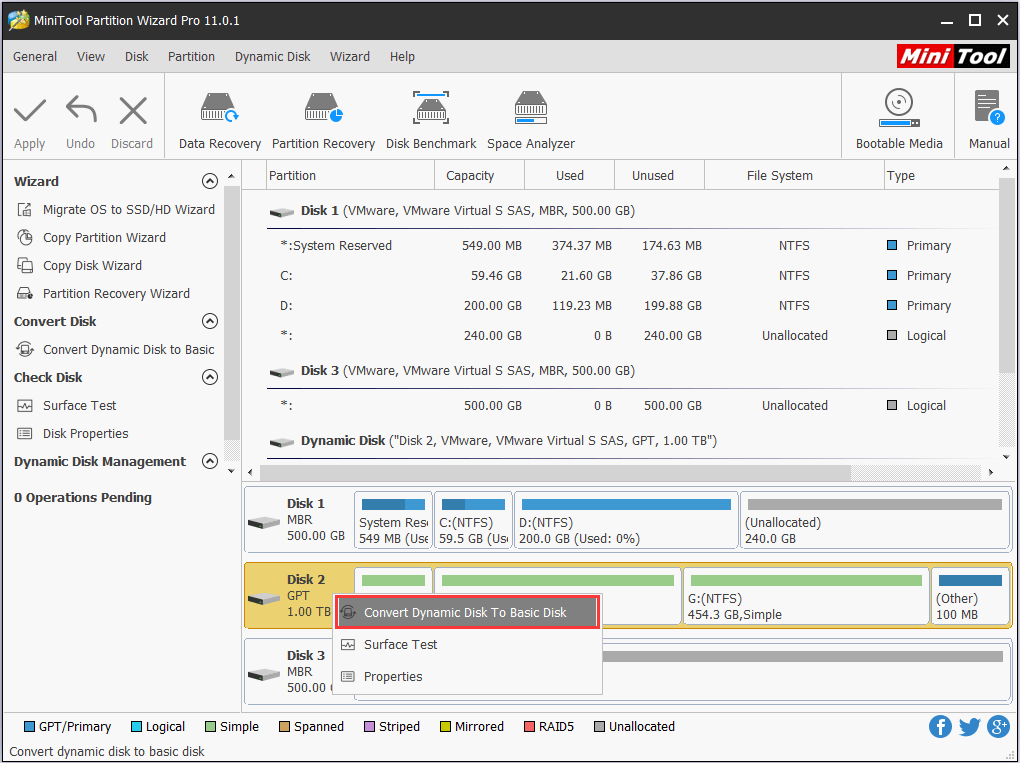
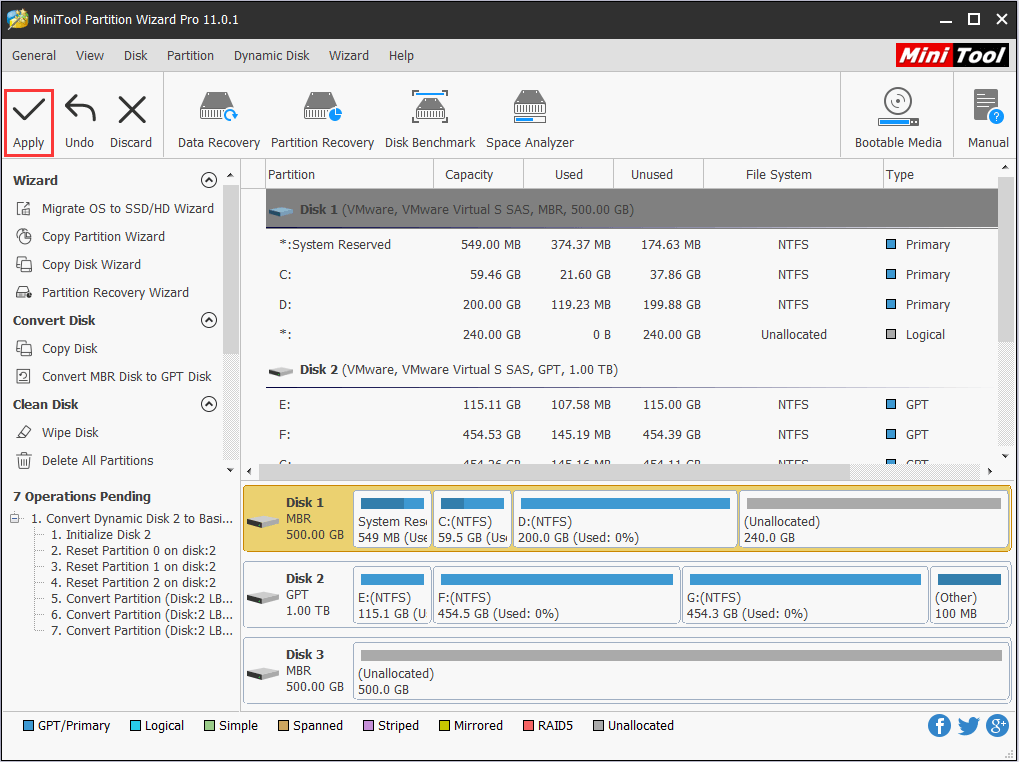
Stride two: confirm functioning.
You tin take a preview that this dynamic disk will become a basic disk without data loss. At this time, press "Apply" to cease this conversion.
Note: The gratis edition does non support operating a dynamic disk, so please buy professional or more than avant-garde editions for dynamic disk back up. In add-on, if Windows cannot boot normally, Division Sorcerer Pro congenital-in tool - MiniTool Partition Sorcerer Bootable CD is bachelor for it can boot a reckoner without Windows OS.
Free Download Purchase Now
ii) Use Disk Direction Utility
Go to Disk Management and then delete all the volumes that were introduced one by one, which has been introduced in Mistake 1. After these steps, the dynamic disk will go basic automatically. However, if in that location is no Windows OS bachelor but you have a Windows installation CD or DVD, make use of Diskpart.
iii) Employ Diskpart
Footstep ane: run cmd.
Boot computer via the installation disc and open CMD by pressing on "Shift + F10".
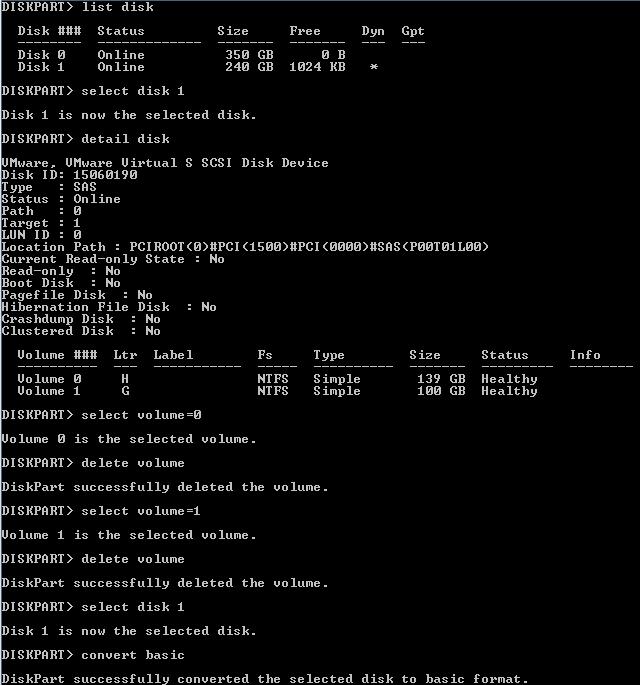
Pace 2: delete volume in diskpart.
Blazon respective commands to delete all dynamic volumes one by one:
"diskpart -> listing disk -> select disk North (N is the number of the dynamic disk) -> item disk -> select volume=0 -> delete volume -> select volume=i -> delete volume…"
Stride 3: After all volumes on the dynamic deejay are deleted, type "convert basic". Once Diskpart shows it has successfully converted the selected dynamic disk to basic, you can blazon "exit" to quit from Diskpart.
Notwithstanding, if yous practice not want to delete any volume because of important data, there is a lossless solution below.
Click to tweet
Error 4: Windows Cannot Be Installed to This Disk. This Figurer'due south Hardware May not Support Booting to This Disk.
Another mistake message you may receive during Windows installation is:
"Windows cannot be installed to this disk. This calculator's hardware may not back up booting to this deejay. Ensure the deejay's controller is enabled in the computer'due south BIOS card."
Reasons
Generally speaking, there are 2 possible reasons:
- Hard disk protection is enabled.
- SATA Controller mode was set incorrectly (with incorrect drive fashion, the very deejay cannot be used ordinarily).
Solutions
Solution 1. Remove Hard Disk Protection
For the first state of affairs, delight read the specification or contact a sales person to ostend whether there is hd protection if the computer is not configured by ourselves. If there is, remove the protection by following the instructions.
Solution 2. Change SATA Controller Mode
For the second situation, if nosotros inverse SATA Controller mode in BIOS before, try setting BIOS to manufactory settings. Different BIOS gives different options to set itself to mill settings, like Restore Defaults, Load BIOS Defaults, and Load Optimal Defaults, and then you should choose the correct one co-ordinate to practical situations.
However, when this solution does non work, you must modify the hard disk mode manually in BIOS. If the electric current state is IDE, change it to AHCI. If the current mode is AHCI, change it to IDE, etc. Actually, if Compatibility or Uniform is given, you must choose this mode.
Moreover, when you are installing the Information Center or Enterprise Server edition of Windows Server 2008/R2 or after to a raw deejay via CD or DVD, you may become the same error. This is considering the default SAN policy during setup on new installations of Data Center or Enterprise SKUs is Offline Shared, which applies Offline and Read Only attributes to any presented disks that are on a shared bus and non considered as System or Boot disks.
RAW disks cannot be detected every bit System or Boot, leading to offline and read just attributes. As a result, you cannot install Windows to these kinds of disks. To solve the trouble, configure the default SAN policy to OnlineAll. For detailed steps, please see the corresponding Setup Reports Error of Microsoft.
Error five: Windows Cannot Be Installed to This Disk. The Disk May Neglect Soon.
Sometimes you may receive the following error message when installing Windows:
"Windows cannot exist installed to this disk. The disk may fail soon. If other hard disks are available, install Windows to another location."
Reasons
When this error appears, it indicates there may be something wrong with the difficult disk.
Solutions
Fill-in and Repair/Supercede the Hard drive
At this time, you must stop Windows installation, and so backup important data immediately in case of a existent disk failure. If there is non so much information that is required to dorsum upwards, merely re-create and paste them to a safe place. However, if y'all want to backup all or a large number of data on the disk, using a tertiary party disk clone software to back up the entire hd tin salvage you a lot of time.
Tip: If there is no Windows to use, you may demand a bootable disk clone tool, and costless MiniTool Sectionalisation Wizard Bootable CD might be a good choice.
When the backup is made, check the health state of the deejay by running a diagnosis and repair tools which tin can exist downloaded either from the hard disk manufacturer's website or from a professional person downloading center. If Windows won't kick, please download the ISO file and burn it to a CD or DVD on another calculator, and then make a disk diagnosis via the bootable disc.
If errors are detected from your hard disk drive only cannot exist repaired, replace the dying hard deejay with a new i. Nevertheless, if it is under warranty, transport information technology back to the manufacturers because they volition repair the disk or give you a new ane.
Error 6: Windows Cannot Be Installed to This Hd Space, Windows Must Be Installed to a Segmentation Formatted in NTFS.
When installing Windows on an former deejay, you may receive a Windows cannot be installed to this hard disk infinite message:
"Windows cannot exist installed to the hd space. Windows must exist installed to a partition formatted in NTFS."
What causes this mistake?
Reasons
This is mainly acquired by an incompatible file system of the partition to be installed with Windows. Microsoft rules that Windows must exist installed to a segmentation formatted in NTFS since Windows Vista.
Solutions
Solution 1. Format the Partition with NTFS File System
1) Use MiniTool Partition Wizard
Remember Windows won't allow you to format the current boot partition no matter if you plough to Deejay Direction or CMD. If y'all have no operating organization to utilize, formatting needs more attempt. Thus, to make things easier, we strongly recommend using MiniTool Partition Wizard Bootable CD to cope with dissimilar situations with one solution. Please exercise the following:
Step 1: use Sectionalisation Wizard Bootable to kick your computer.
On the tool bar of each Segmentation Sorcerer paid editions, launch Bootable Media Builder to create a bootable CD/DVD disc or USB wink drive. Then set your computer to boot from the bootable media and finally enter MiniTool Sectionalization Sorcerer Bootable.
Tip: If you do not accept a bootable media builder, you tin upgrade to MiniTool Partition Sorcerer advanced editions.
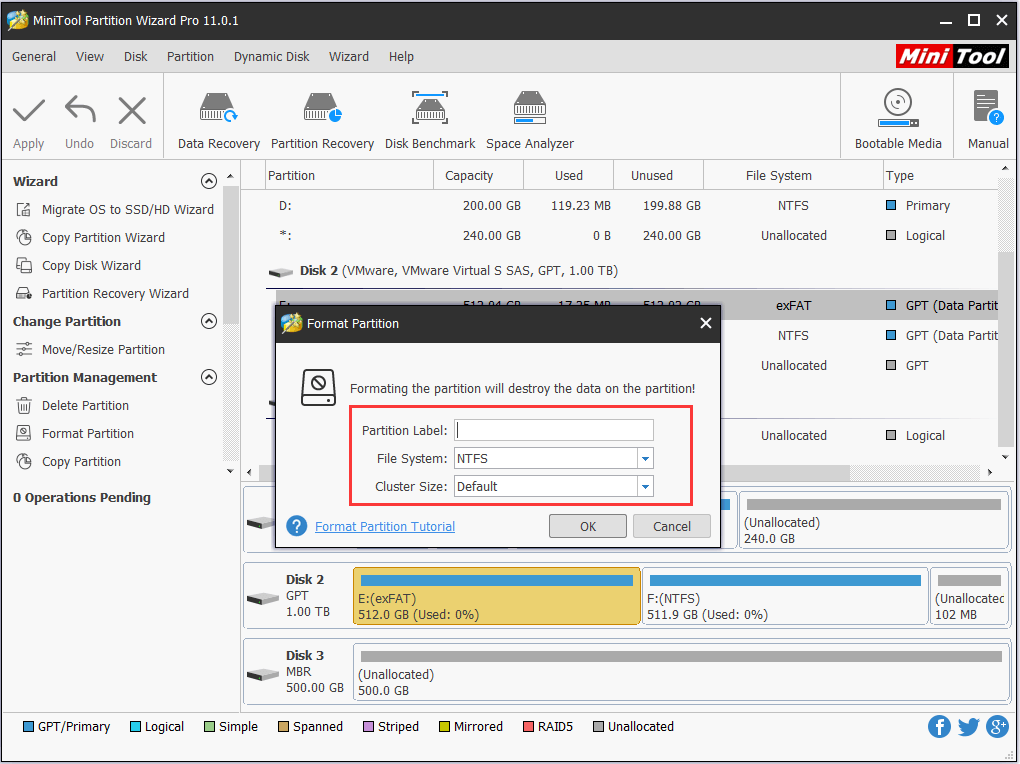
Click on the partition to be formatted and select "Format Partition" from the operations menu.
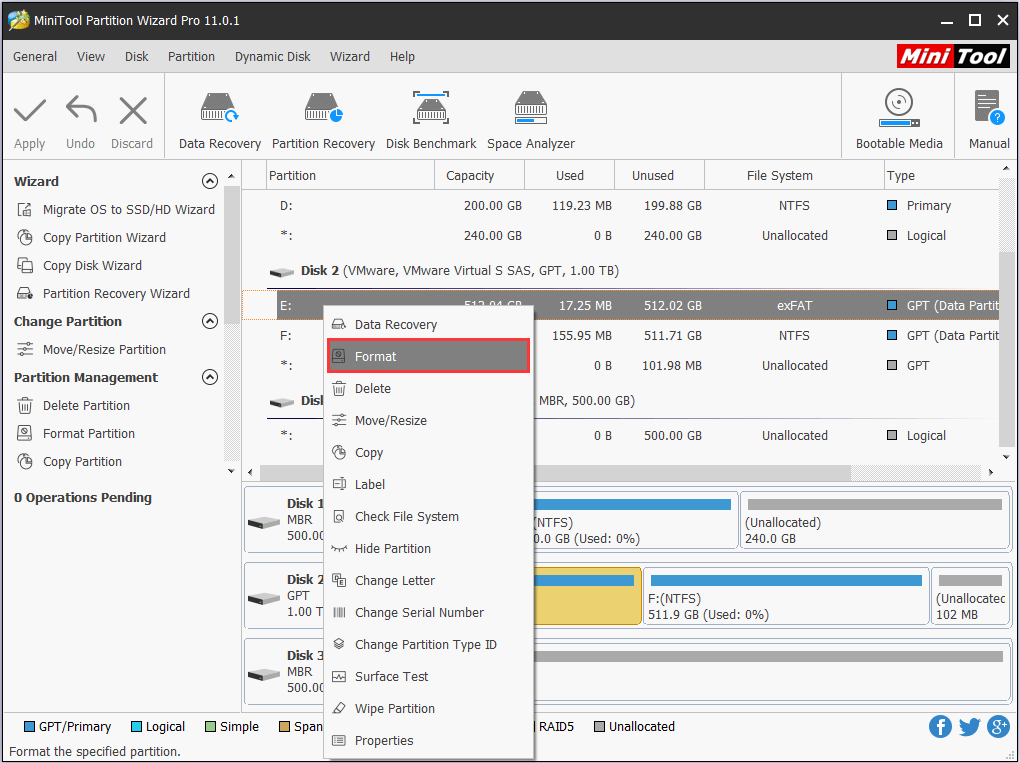
Footstep three: choose NTFS as the desired file system.
In the pop-upwards window, choose NTFS at file organization and then click "OK" to continue.
Pace 4: execute the operation.
Go back to the main interface and hit "Apply" to execute this change.
Purchase Now
2) Employ Windows Installation Disk
Likewise you can choose to format the sectionalization during the installation. When you meet "where practice yous want to install Windows", click on the target partition at showtime and then hit Drive Options (Avant-garde) to format it.
Solution 2. Clean the Whole Drive
Some other solution for Windows should be installed to a sectionalization formatted in NTFS is to clean the whole drive. You can also use MiniTool Sectionalisation Wizard Bootable CD to practise this task (utilise Delete All Partitions), then Windows volition make its partition automatically during installation.
Summary
If you lot receive i of the 6 errors during a Windows installation, I promise our solutions are useful for you lot. If they prove to exist useful, delight share to help more people. Should y'all accept whatever doubts or bug, please feel free to leave us your comments in the following area or send to [e-mail protected]. We will try our best to assistance you get out of trouble.
0 Response to "Windows Cannot Be Installed on the Current Disk Computer Hardware"
Post a Comment